Overview
In this topic we will describe certain use cases for your CDP.
Methods
In these examples we showcase what you can do with the javascript API.
Read capture BEFORE capture is saved and sent to Unomi
In this example we print the data which will be sent to Unomi:
<script>
    window.dsdc = window.dsdc || function () { (dsdc.q = dsdc.q || []).push(arguments) }; dsdc.l = +new Date;

    window.dsdc('beforeRequest', function (data) {

        // read the capture data before script is loaded
        console.log(data.requestData);
    });
</script>
Read & modify capture BEFORE it was saved and sent to Unomi
Remove data from capture
In this example we remove some data before sending it to Unomi:
<script>
    window.dsdc = window.dsdc || function () { (dsdc.q = dsdc.q || []).push(arguments) }; dsdc.l = +new Date;

    window.dsdc('beforeRequest', function (data) {

        var changedCapture = data.requestData;

        // make a change, eg. remove the cookies from capture
        changedCapture.browserData.browser.dataCookies = {};

        // use a global function to pass the modified capture back to the main script
        dsdc.updateCapture(changedCapture);
    });
</script>
Add day of the week to capture
In this example we add some data before sending it to Unomi:
<script>
    window.dsdc = window.dsdc || function () { (dsdc.q = dsdc.q || []).push(arguments) }; dsdc.l = +new Date;

    window.dsdc('beforeRequest', function (data) {

        var changedCapture = data.requestData;

        // make a change, eg. add the day of the week to the capture
        var today = new Date();
        changedCapture.te__dayOfWeek = today.toLocaleDateString("en-US", { weekday: 'long' });

        // use a global function to pass the modified capture back to the main script
        dsdc.updateCapture(changedCapture);
    });
</script>
Add birthday with date of today to capture
In this example we add some data before sending it to Unomi:
<script>
    window.dsdc = window.dsdc || function () { (dsdc.q = dsdc.q || []).push(arguments) }; dsdc.l = +new Date;

    window.dsdc('beforeRequest', function (data) {

        var changedCapture = data.requestData;

        // make a change, eg. add today to the capture as birthday
        changedCapture.da__birthday = (new Date()).toISOString();

        // use a global function to pass the modified capture back to the main script
        dsdc.updateCapture(changedCapture);
    });
</script>
Read response AFTER capture is saved and sent to Unomi
In this example we read the data that was sent to Unomi:
<script>
    window.dsdc = window.dsdc || function () { (dsdc.q = dsdc.q || []).push(arguments) }; dsdc.l = +new Date;

    window.dsdc('afterResponse', function (data) {

      // read the response data after the capture is sent to Unomi
      console.log(data.responseData);
  });
</script>
Prevent datacaptures
Prevent all data captures
In this example we prevent all captures being sent to Unomi:
<script>
    window.dsdc = window.dsdc || function () { (dsdc.q = dsdc.q || []).push(arguments) }; dsdc.l = +new Date;

    window.dsdc('preventCapture', true);
</script>
Prevent data captures for form submits only
In this example we prevent all form submits from being sent to Unomi:
<script>
    window.dsdc = window.dsdc || function () { (dsdc.q = dsdc.q || []).push(arguments) }; dsdc.l = +new Date;

    window.dsdc('preventCapture', true, 'formSubmit');
</script>
Prevent all data captures on Sundays
In this example we prevent all captures from being sent to Unomi on Sundays:
<script>
    window.dsdc = window.dsdc || function () { (dsdc.q = dsdc.q || []).push(arguments) }; dsdc.l = +new Date;

    var today = new Date();
    if (today.getDay() == 0) {
        window.dsdc('preventCapture', true);
    }
</script>
Enable the js and load events, which are prevented by default
In this example we enable certain events to be sent to Unomi which are disabled by default:
<script>
    window.dsdcSettings = window.dsdcSettings || {};
    dsdcSettings.preventCapture = dsdcSettings.preventCapture || {};

    // Set the preventCapture of these events to false
    // This means they are no longer prevented
    dsdcSettings.preventCapture.js = false;
    dsdcSettings.preventCapture.load = false;

    console.error(dsdcSettings);
</script>
Merging Unomi profiles based on a property
Newsletter
In this example we will set up Unomi to merge the profiles of visitors who use the same email address when subscribing to the newsletter.
Snippet
We use this snippet to check if an email field is found on the newsletter page, and if it does, it will use the email address the visitor gave in as the merge identifier for Unomi when the subscribe to the newsletter button is clicked:
<script>
    // enable namespace that handles the queue and methods
    window.dsdc = window.dsdc || function () { (dsdc.q = dsdc.q || []).push(arguments) }; dsdc.l = +new Date;

    // merge profiles
    var getCaptureHandler = function (data) {

        // temporary store our capture data & potential merge value
        var changedCapture = data.requestData;

        // get the element of which you want to use the value to merge your Unomi profiles on
        var myMergeElement = document.getElementById("mauticform_input_newsletternl_email"); // email field on the newsletter page

        // if this element was found on the current page
        if (myMergeElement !== null && typeof myMergeElement != "undefined") {
            // get the value of this element
            myMergeValue = myMergeElement.value;

            // append the property to the capture if any found and event is a form submit
            if (myMergeValue !== null && typeof myMergeValue != "undefined" && changedCapture.event.eventData.te__activity == "form_submit") {
                // add the merge property to the capture data under the key te__mergeIdentifier_1
                changedCapture.te__mergeIdentifier_1 = myMergeValue;

                // send the changed data back to the main script
                dsdc.updateCapture(changedCapture);
            }
        }
    }

    window.dsdc('beforeRequest', getCaptureHandler);
</script>
Test
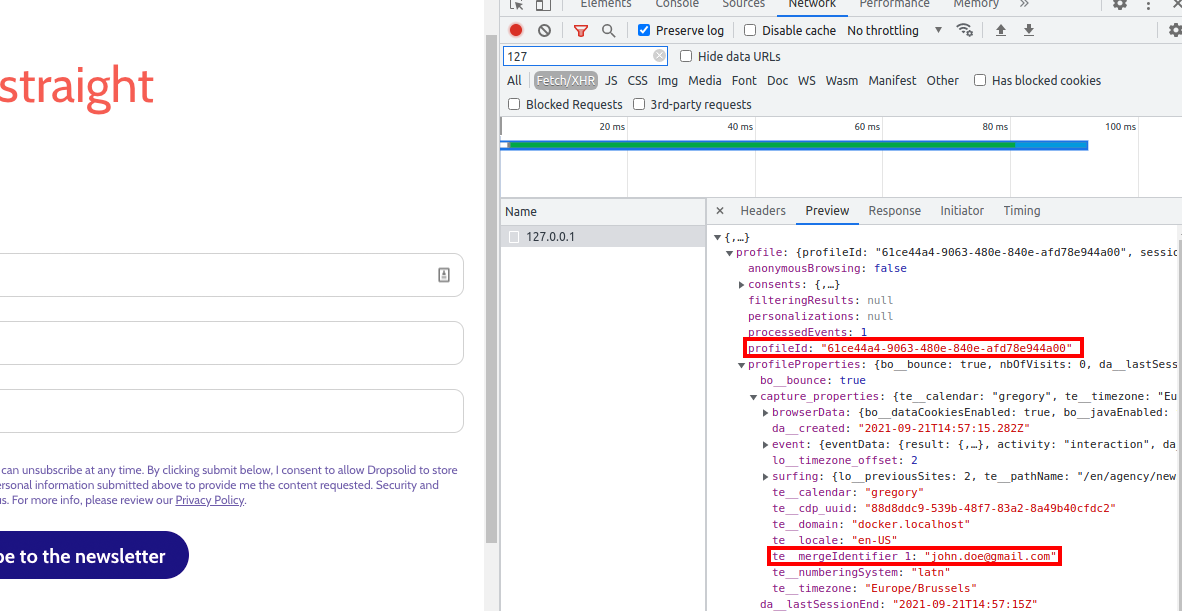
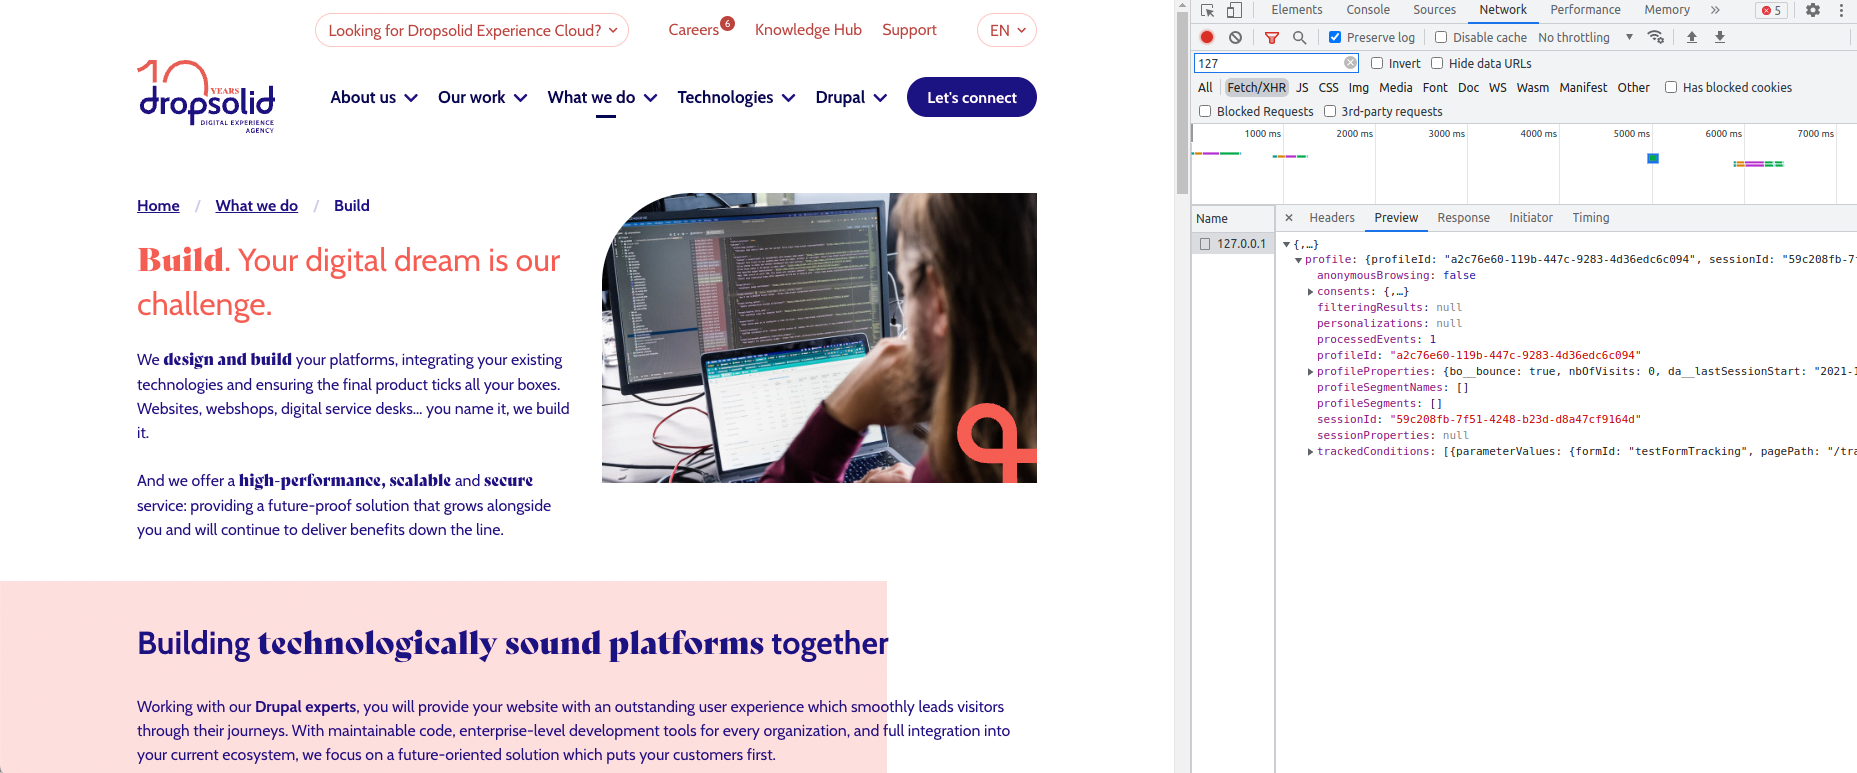
We go to the page where visitors can subscribe to the newsletter and we fill in our email address, first and last name.
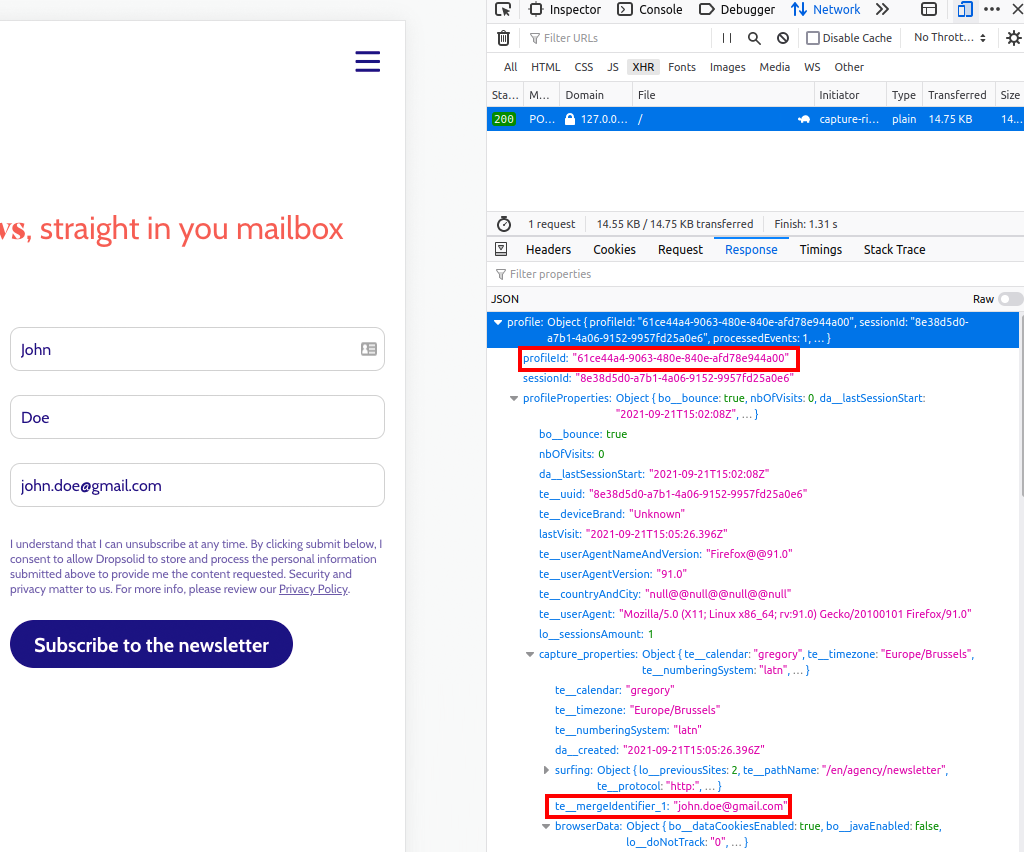
We click on the subscribe to the newsletter button and then we inspect the page. In the network tab we see the capture data that was sent to Unomi and the profile it returns in response. We see our PC visitor has the profile id 61ce44a4-9063-480e-840e-afd78ec944a00 and Unomi has the email address we gave in as the merge identifier.
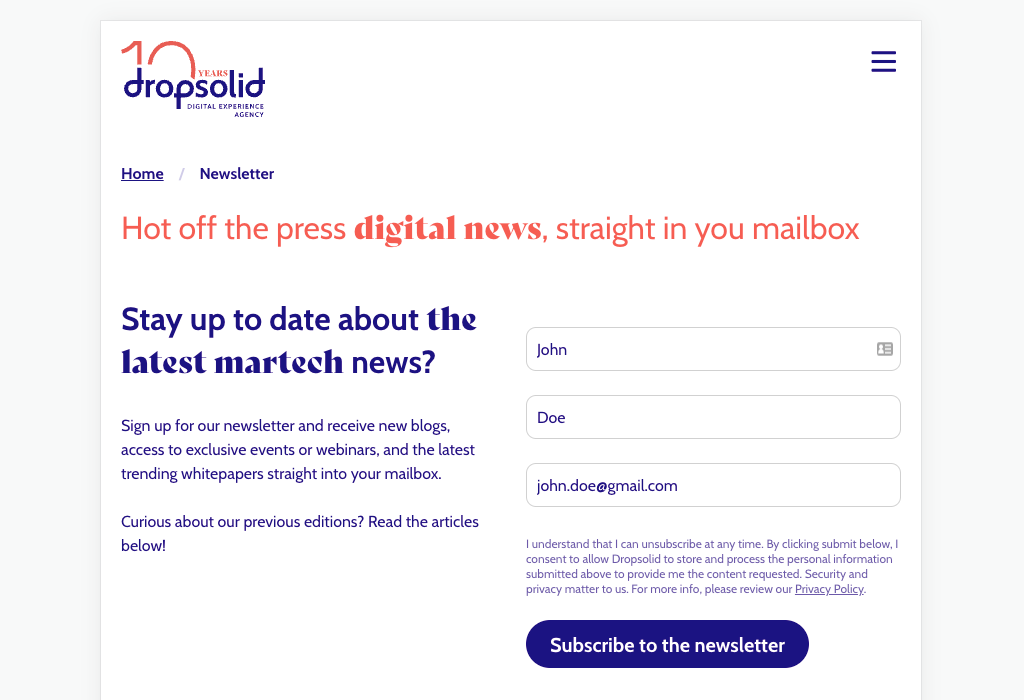
Next, we visit the same newsletter page on a tablet. The site does not know we are the same visitor as on the PC. We fill in our email address, first and last name.
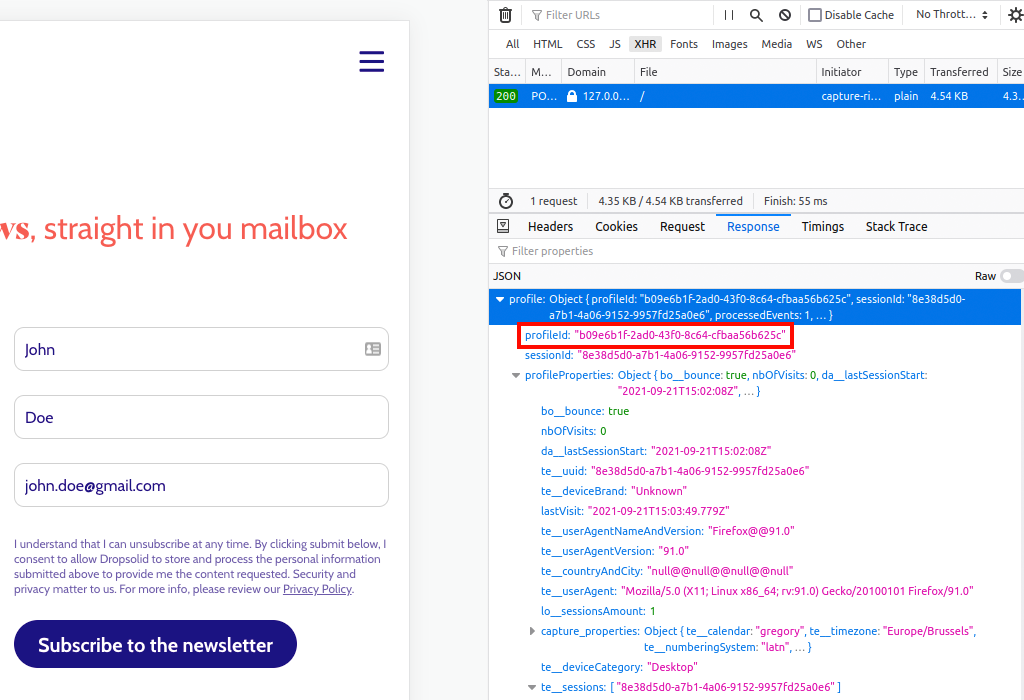
We inspect the page before clicking on the subscribe to the newsletter button. In the network tab we see the capture data that was sent to Unomi and the profile it returns in response when we went to the newsletter page. We see our tablet visitor has the profile id b09e6b1f-2ad0-43f0-8c64-cfbaa56b625c, so Unomi views the tablet visitor as a different person.
We click on the subscribe to the newsletter button and then we inspect the page again. In the network tab we see the capture data that was sent to Unomi and the profile it returns in response. We see our tablet visitor has the profile id 61ce44a4-9063-480e-840e-afd78ec944a00 and Unomi has the email address we gave in as the merge identifier.
This means Unomi recognised a profile already exists with the same email address, so it merged the profile of the tablet visitor into the profile of the PC visitor.
The digital journey can now be continued as the same person across different devices!
Keep a score of your visitors
Keep in mind Unomi does not combine scores when profiles are merged.
Tracking targets
In this example we will set up Unomi to keep track of scoring for visitors of dxp and agency, so we can then create segments for marketeers and technical profiles to categorise the visitors.
Snippet
We use this snippet to increase or decrease the score based on the target page. If the visitor interacts (event) with a dxp page, the score for tech will increase and decrease for marketeer. If the visitor interacts (event) with an agency page, the score for marketeer will increase and decrease for tech.
<script>
    // enable namespace that handles the queue and methods
    window.dsdc = window.dsdc || function () { (dsdc.q = dsdc.q || []).push(arguments) }; dsdc.l = +new Date;

    // enable scoring
    window.dsdc('beforeRequest', function (data) {

        // temporary store our capture data & potential merge value
        var changedCapture = data.requestData;

        // check if the visitor interacted with a dxp page
        if (changedCapture.te__target == "dxp") {
            // increase score for tech and decrease for marketeer
            changedCapture.scoring = {
                "targets": {
                    "tech": {
                        "te__operator": "+",
                        "te__value": "1"
                    },
                    "marketeer": {
                        "te__operator": "-",
                        "te__value": "1"
                    }
                }
            };
        }

        // check if the visitor interacted with an agency page
        if (changedCapture.te__target == "agency") {
            // increase score for marketeer and decrease for tech
            changedCapture.scoring = {
                "targets": {
                    "tech": {
                        "te__operator": "-",
                        "te__value": "1"
                    },
                    "marketeer": {
                        "te__operator": "+",
                        "te__value": "1"
                    }
                }
            };
        }

        // use a global function to pass the modified capture back to the main script
        dsdc.updateCapture(changedCapture);
    });
</script>
Segment
These scoring properties will be available when creating a segment when at least one profile has the scoring properties, so we click once on the starting page of dxp in order for the scoring to get in a profile.
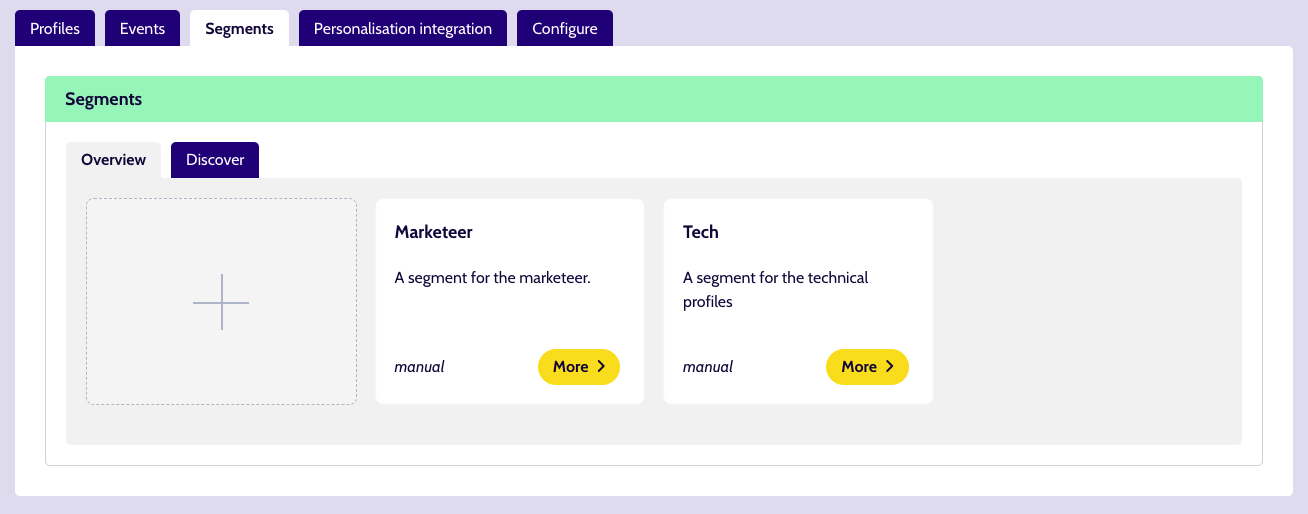
Now that Unomi has these scores, we can create segments to start categorising the visitors.
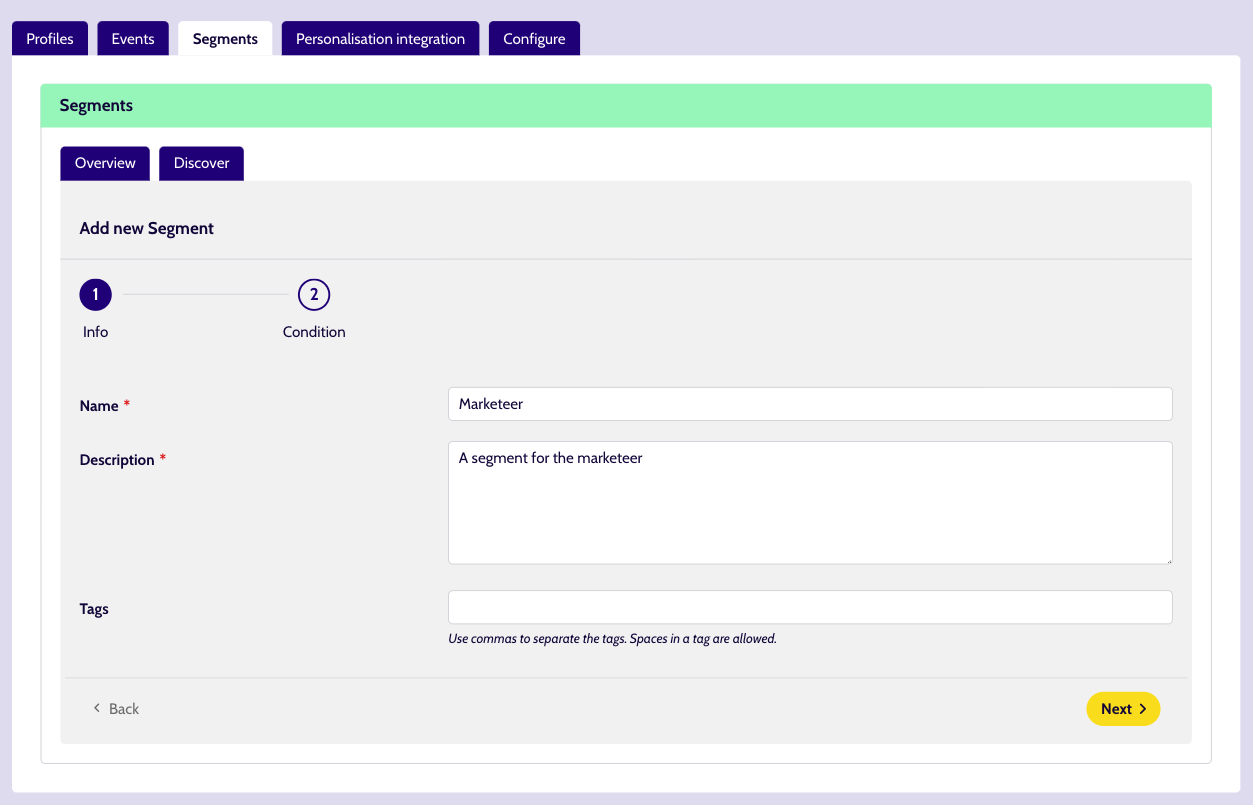
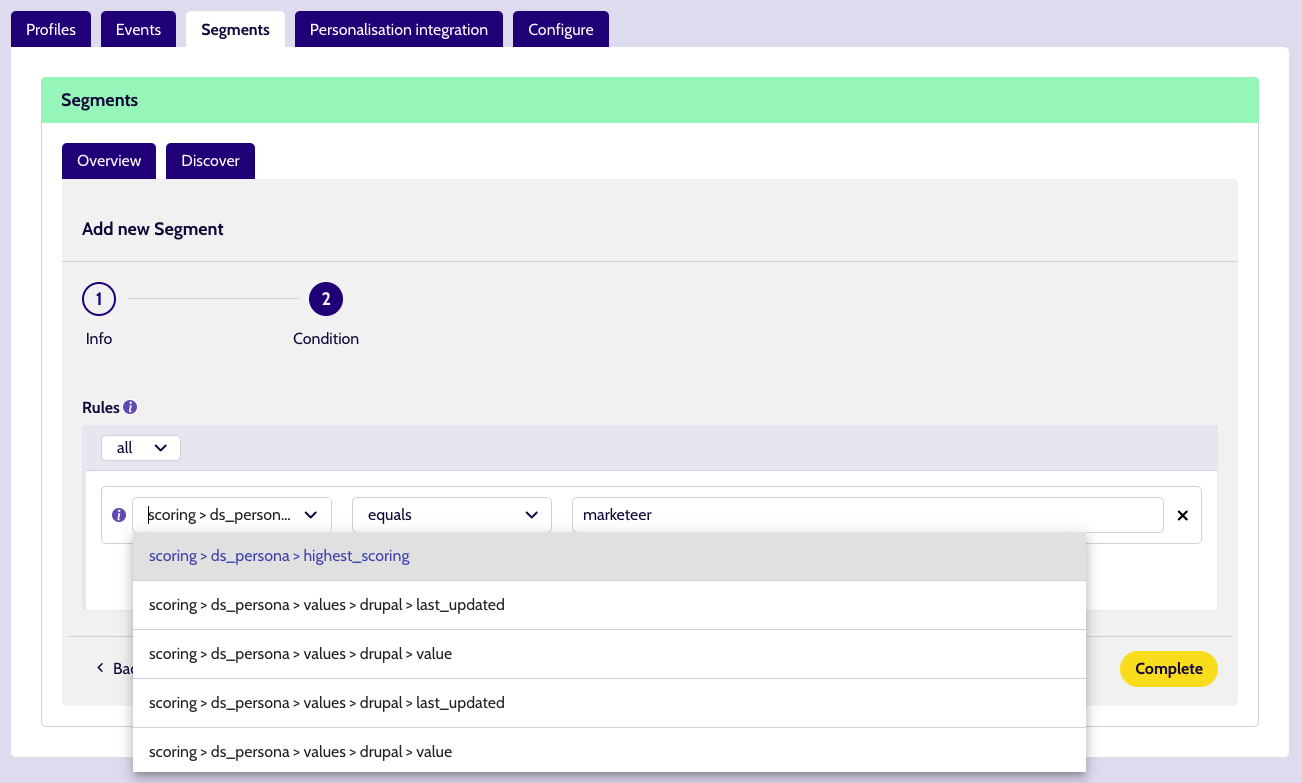
We start by creating a segment for marketeers. Here we add a rule which checks if the highest scoring name is marketeer, so if the score for marketeer is higher than tech in the targets group Unomi will assign this segment to the visitor.
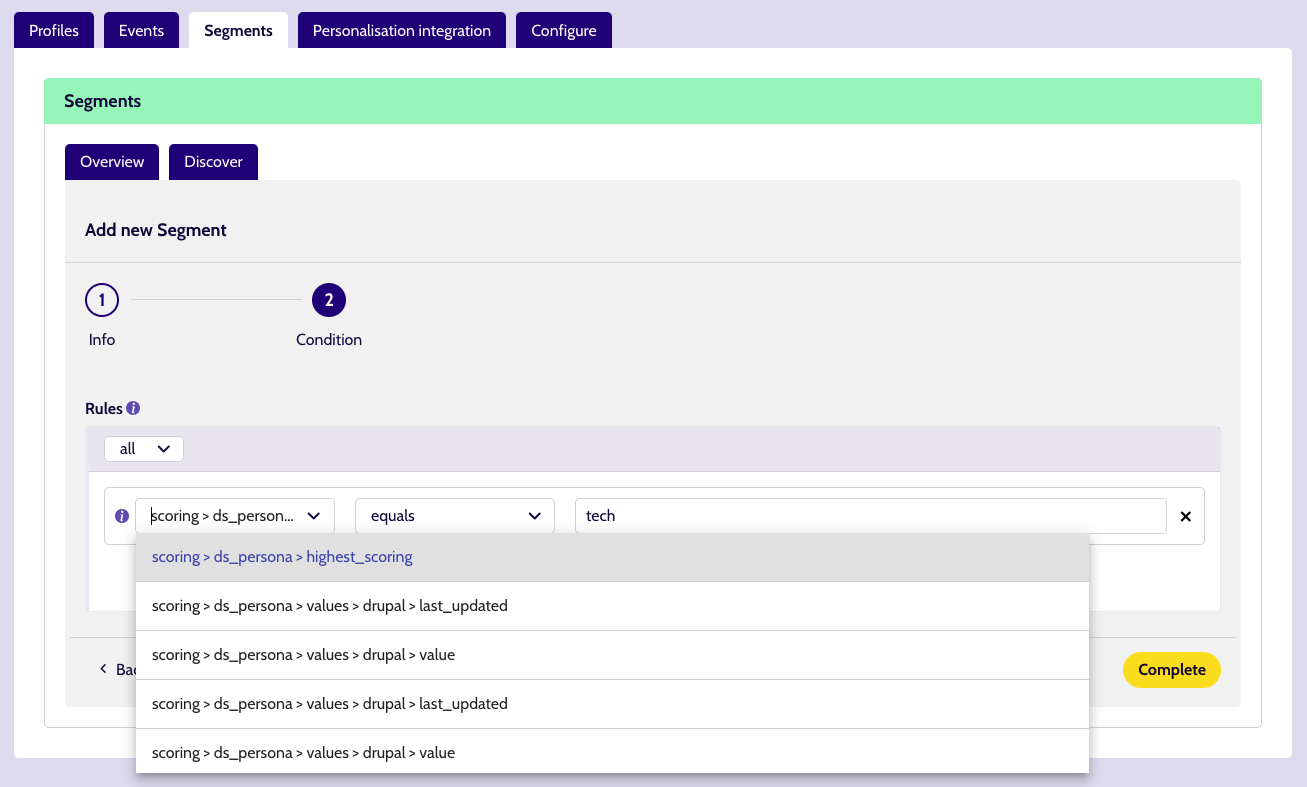
We continue by creating a segment for technical profiles. Here we add a rule which checks if the highest scoring name is tech, so if the score for tech is higher than marketeer in the targets group Unomi will assign this segment to the visitor.

Now that we have segments for both our target groups, we can test them out.
Test
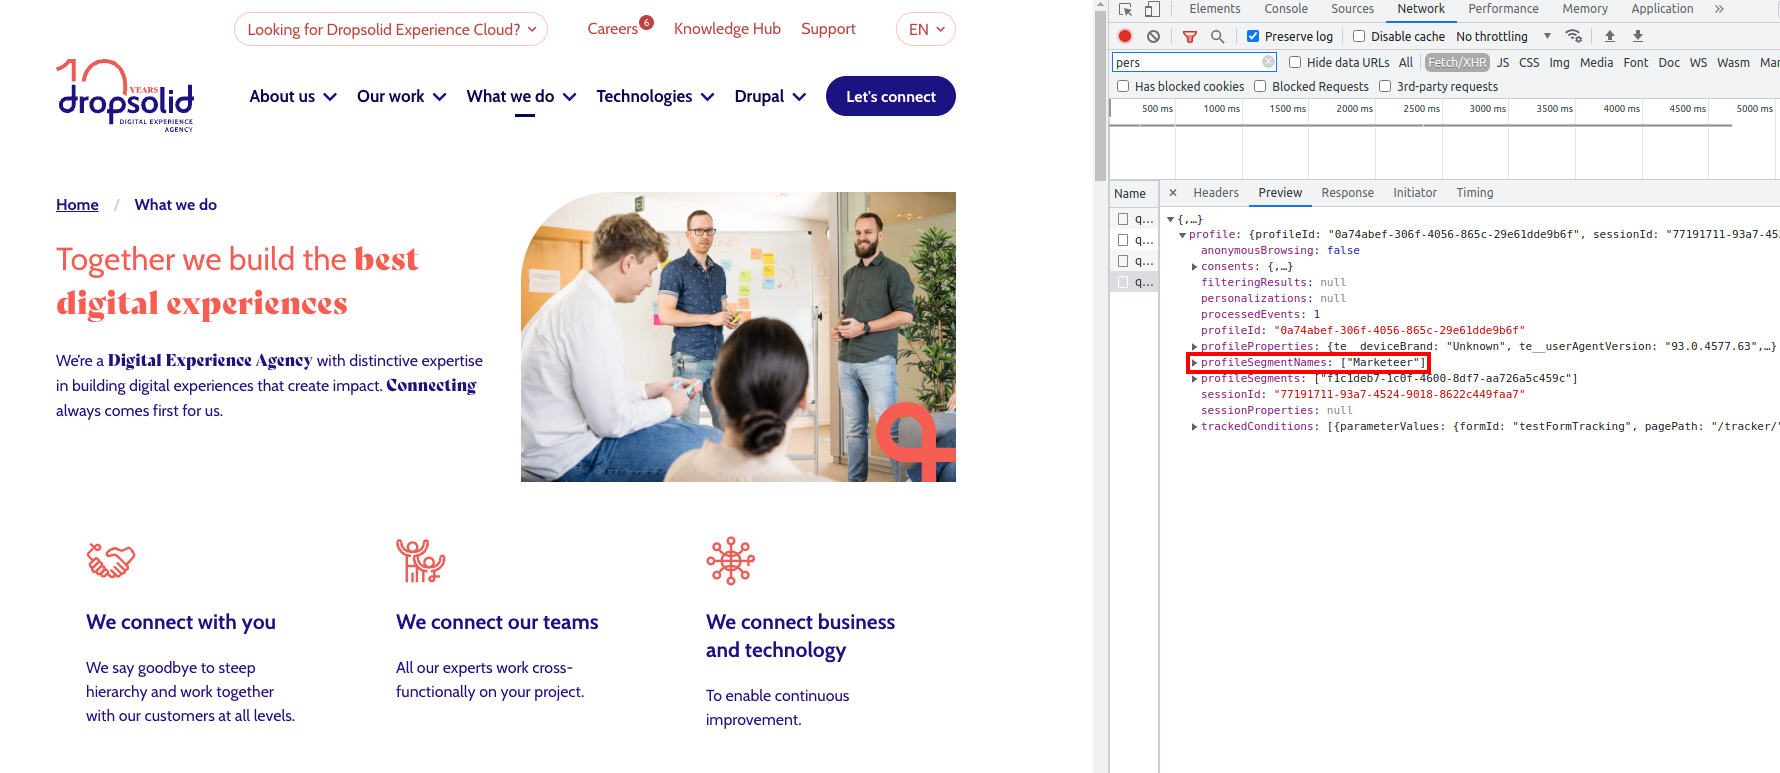
We go to an agency page and interact with the page by clicking around a few times. By inspecting the page, we see that Unomi assigned the marketeer segment to our profile.
Next, we go to a Drupal webinar page and interact with it more than we did on the other page. By inspecting the page, we see Unomi removed the marketeer segment from our profile and assigned the tech segment instead.
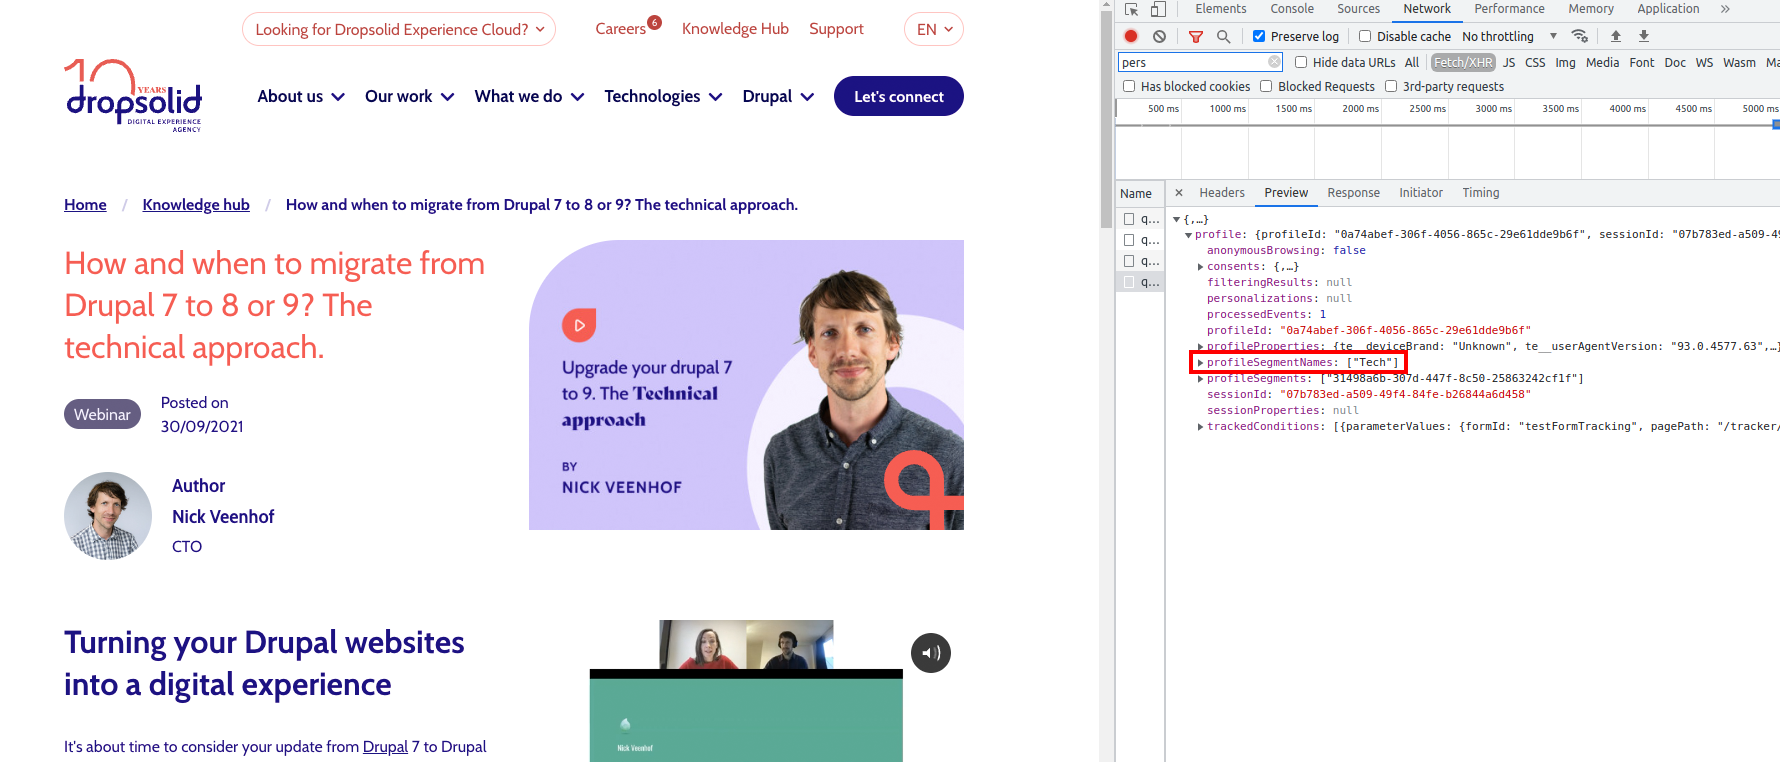
Target groups can now get more relevant personalised content!
UTM
Tracking UTM parameters
In this example we will set up Unomi to keep track of UTM parameters in visitor profiles.
Snippet
We use this snippet to check if UTM parameters are found in the URL, and if there are, it will save them in Unomi:
<script>
    // enable namespace that handles the queue and methods
    window.dsdc = window.dsdc || function () { (dsdc.q = dsdc.q || []).push(arguments) }; dsdc.l = +new Date;

    // track UTM parameters
    window.dsdc('beforeRequest', function (data) {

        // temporary store our capture data & potential merge value
        var changedCapture = data.requestData;

        // get query parameters in URL
        queryString = window.location.search;

        // check if URL contains query parameters
        if (queryString != '') {
            // get UTM parameters
            urlParams = new URLSearchParams(queryString);
            utmCampaign = urlParams.get('utm_campaign');
            utmSource = urlParams.get('utm_source');
            utmContent = urlParams.get('utm_content');
            utmMedium = urlParams.get('utm_medium');

            // add UTM parameters to capture data
            changedCapture.te__utmCampaign = utmCampaign;
            changedCapture.te__utmSource = utmSource;
            changedCapture.te__utmContent = utmContent;
            changedCapture.te__utmMedium = utmMedium;
        }

        // use a global function to pass the modified capture back to the main script
        dsdc.updateCapture(changedCapture);
    });
</script>
Test
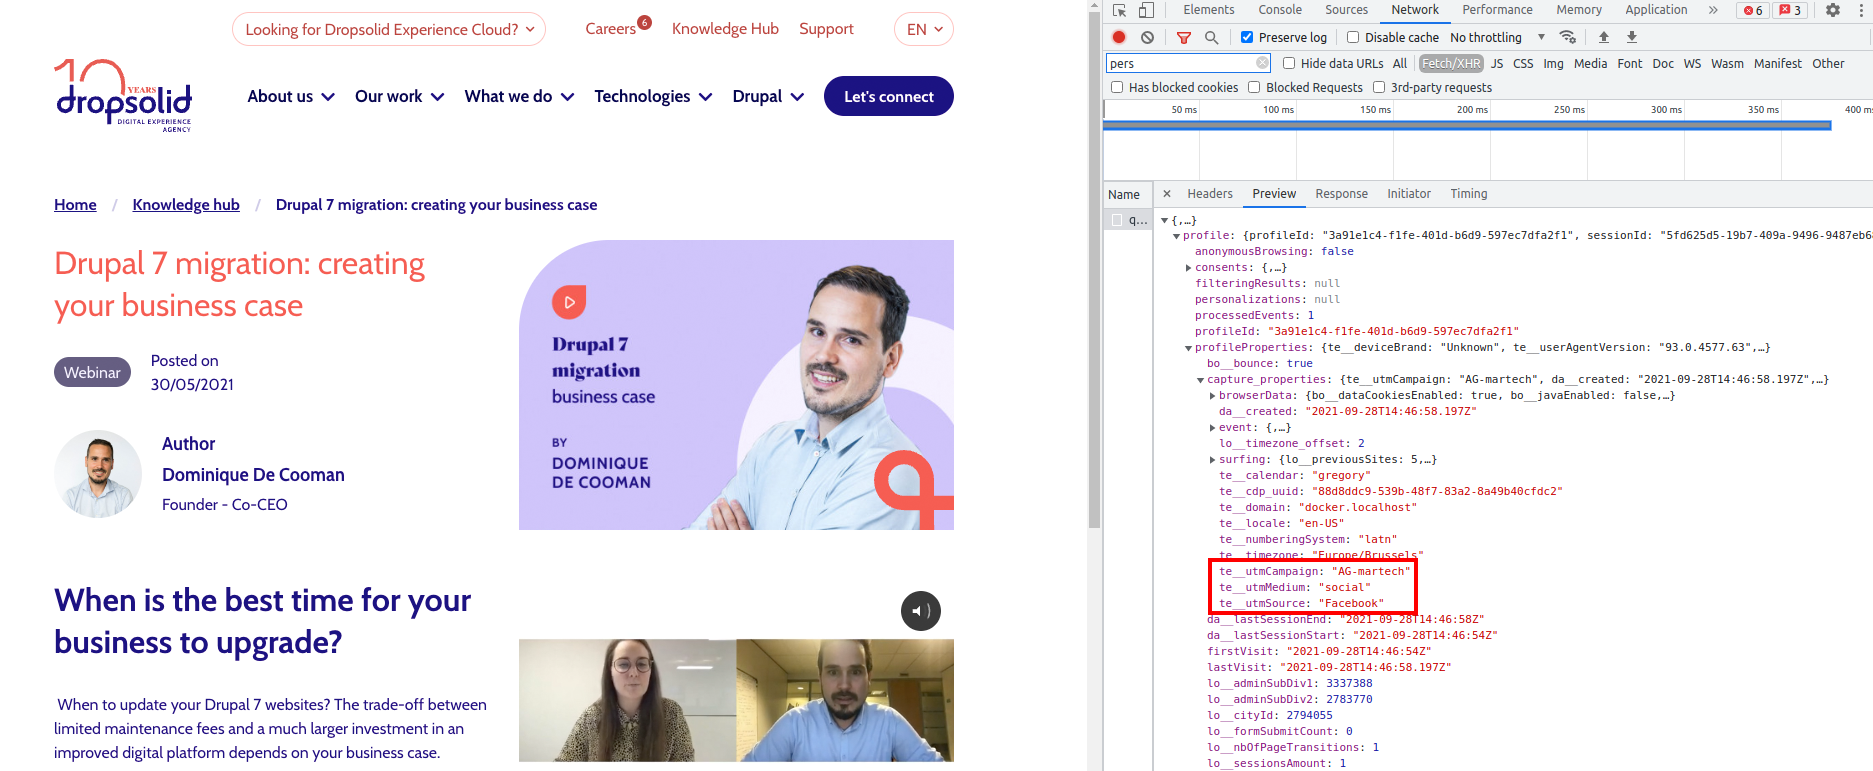
We click on this link that we found on a Dropsolid post on Facebook.
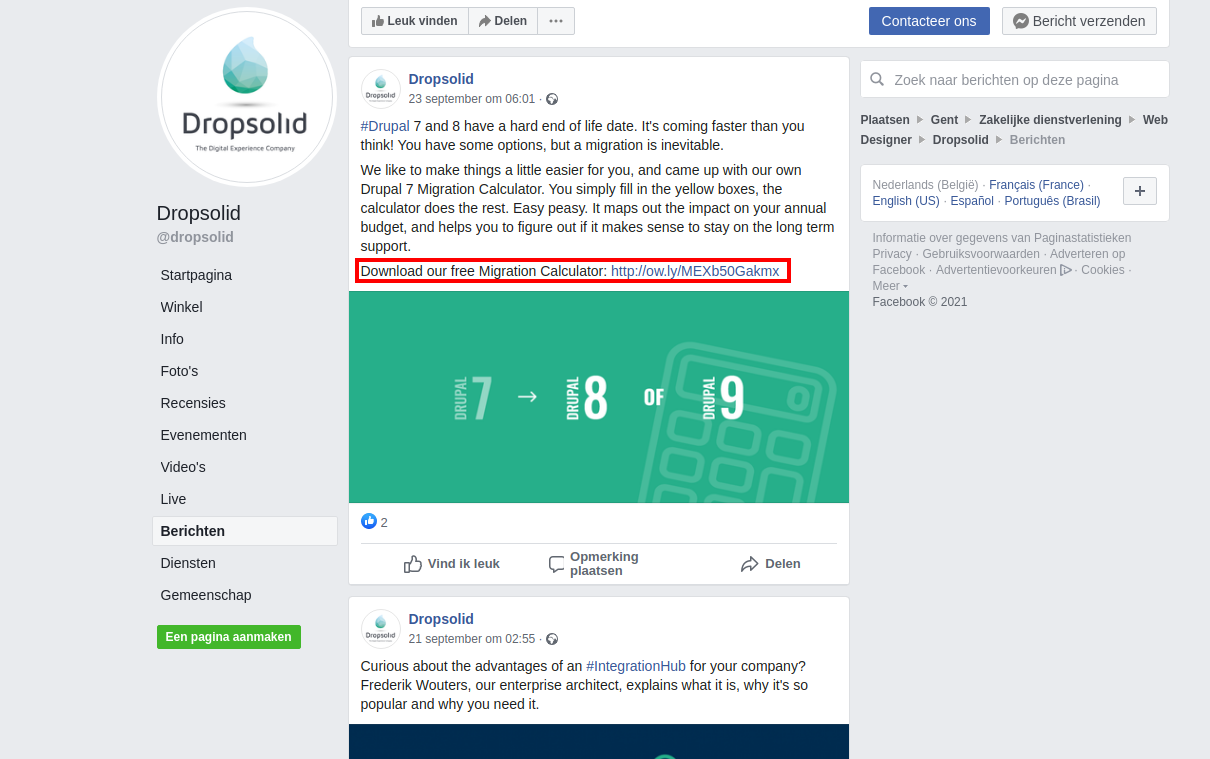
We are redirected to a page which has these UTM parameters:
- utm_campaign = AG-martech
- utm_source = Facebook
- utm_medium = social
We inspect the page and in the network tab we see the capture data that was sent to Unomi and the profile it returns in response when we went to this page. We see our visitor has the UTM parameters in the Unomi profile.
Now segments can be created in Unomi using these UTM parameters to better categorise visitors!
Mautic integration
These are examples of the Mautic integration feature which can be manually added to your site.
Send Mautic ID to Unomi
We use this snippet to get the visitor's Mautic ID and send it to Unomi:
<script>
    // enable namespace that handles the queue and methods
    window.dsdc = window.dsdc || function () { (dsdc.q = dsdc.q || []).push(arguments) }; dsdc.l = +new Date;

    // Now BEFORE each capture happens, we'll check if we can find a Mautic ID
    // and send it along with the capture data

    // this is the function that looks for the ID and appends it to the capture data
    var getMauticIdHandler = function (data) {
        // temp store our capture data & potential Mautic id
        var changedCapture = data.requestData;

        // Get the Mautic ID value with the mtcId function that can also be used in console. (returns undefined if it doesn't exist)
        var mauticId = window.mtcId;

        // append the ID to the capture if any found
        if (mauticId !== null && mauticId !== undefined) {
            changedCapture.te__mautic_id = mauticId;

            // send the changed data back to the main script
            dsdc.updateCapture(changedCapture);
        }
    }

    // This method will make sure to execute the function
    // BEFORE each capture is saved (so for every event)
    window.dsdc('beforeRequest', getMauticIdHandler);
</script>
Send Unomi profile segment UUIDs & human-readable names to Mautic
You need to create custom fields in Mautic to implement this example:
- 1 for the Unomi profile segment uuids
- 1 for the Unomi profile segment names
| Human readable label | Alias | Publicly updatable |
|---|---|---|
| personalisation segment uuid | personalisation_segment_u | Yes |
| personalisation segment label | personalisation_segment_l | Yes |
The labels and aliases seen above are examples. You can choose what label and alias you want to give your custom field. Keep in mind you will need to update the alias names in the snippet if your alias is not the same as the example.
We use this snippet to get the segment names and uuids from the visitor's Unomi profile and send them to Mautic:
<script>
    // enable namespace that handles the queue and methods
    window.dsdc = window.dsdc || function () { (dsdc.q = dsdc.q || []).push(arguments) }; dsdc.l = +new Date;

    // this is a function to be able to compare 2 objects with each other
    // we use it to check if the user's Unomi segments have changed
    function shallowEqual(object1, object2) {
        if (object1 == null || object2 == null) {
            return false;
        }
        const keys1 = Object.keys(object1);
        const keys2 = Object.keys(object2);
        if (keys1.length !== keys2.length) {
            return false;
        }
        for (let key of keys1) {
            if (object1[key] !== object2[key]) {
                return false;
            }
        }
        return true;
    }

    // this is the function that reads the profile segment uuids and human readable names and sends them to Mautic
    var sendToMauticHandler = function (data) {
        // create a string of all the uuids of the segments, separated by ", "
        var segmentsUuid = data.responseData.profile.profileSegments.join(", ");

        // if the user doesn't belong to a segment, use the standard value "_unknown"
        if (segmentsUuid == "") {
            segmentsUuid = "_unknown";
        }

        // create a string of all the names of the segments, separated by ", "
        var segmentsNames = data.responseData.profile.profileSegmentNames.join(", ");

        // if the user doesn't belong to a segment, use the standard value "_unknown"
        if (segmentsNames == "") {
            segmentsNames = "_unknown";
        }

        // get the last known segments from localStorage
        var localSegmentObject = localStorage.getItem("myStoredUnomiSegments");

        // if there are segments stored in localStorage, parse the output to get an object
        if (localSegmentObject != null) {
            localSegmentObject = JSON.parse(localSegmentObject);
        }

        // create an object to send to Mautic
        var mauticObject = {
            "personalisation_segment_u": segmentsUuid,
            "personalisation_segment_l": segmentsNames
        };

        // check if there are properties to send to Mautic and if the Unomi segments changed to only send the segments to Mautic if they changed (to reduce the amount of pageviews being sent to Mautic)
        if (Object.keys(mauticObject).length > 0 && !shallowEqual(mauticObject, localSegmentObject)) {
            // only send Mautic event if there is at least one property to be sent and if the segments changed (with this we also detect name changes of segments)
            mt('send', 'pageview', mauticObject);
            // save the object that we sent to Mautic in localStorage, to use this to check if something changed later on
            localStorage.setItem("myStoredUnomiSegments", JSON.stringify(mauticObject));
        }
    }

    window.dsdc('afterResponse', sendToMauticHandler);
</script>
Combination of sending Mautic ID to Unomi and Unomi profile segment UUIDs & names to Mautic
We use this snippet to get the visitor's Mautic ID and send it to Unomi, and to get the segment names and uuids from the visitor's Unomi profile and send them to Mautic:
<script>
    // enable namespace that handles the queue and methods
    window.dsdc = window.dsdc || function () { (dsdc.q = dsdc.q || []).push(arguments) }; dsdc.l = +new Date;

    // Now BEFORE each capture happens, we'll check if we can find a Mautic ID
    // and send it along with the capture data

    // this is the function that looks for the ID and appends it to the capture data
    var getMauticIdHandler = function (data) {

        // temp store our capture data & potential Mautic id
        var changedCapture = data.requestData;

        // Get the Mautic ID value with the mtcId function that can also be used in console. (returns undefined if it doesn't exist)
        var mauticId = window.mtcId;

        // append the ID to the capture if any found
        if (mauticId !== null && mauticId !== undefined) {
            changedCapture.te__mautic_id = mauticId;

            // send the changed data back to the main script
            dsdc.updateCapture(changedCapture);
        }
    }

    // This method will make sure to execute the function
    // BEFORE each capture is saved (so for every event)
    window.dsdc('beforeRequest', getMauticIdHandler);

    // If you want to minimize the amount of times this is done,
    // you can associate the Mautic retrieval with a specific event instead,
    // eg. on script load:
    // window.dsdc('beforeRequest', 'dom', getMauticIdHandler);

    // this is a function to be able to compare 2 objects with each other
    // we use it to check if the user's Unomi segments have changed
    function shallowEqual(object1, object2) {
        if (object1 == null || object2 == null) {
            return false;
        }
        const keys1 = Object.keys(object1);
        const keys2 = Object.keys(object2);
        if (keys1.length !== keys2.length) {
            return false;
        }
        for (let key of keys1) {
            if (object1[key] !== object2[key]) {
                return false;
            }
        }
        return true;
    }

    // this is the function that reads the profile segment uuids and human readable names and sends them to Mautic
    var sendToMauticHandler = function (data) {
        // create a string of all the uuids of the segments, separated by ", "
        var segmentsUuid = data.responseData.profile.profileSegments.join(", ");

        // if the user doesn't belong to a segment, use the standard value "_unknown"
        if (segmentsUuid == "") {
            segmentsUuid = "_unknown";
        }

        // create a string of all the names of the segments, separated by ", "
        var segmentsNames = data.responseData.profile.profileSegmentNames.join(", ");

        // if the user doesn't belong to a segment, use the standard value "_unknown"
        if (segmentsNames == "") {
            segmentsNames = "_unknown";
        }

        // get the last known segments from localStorage
        var localSegmentObject = localStorage.getItem("myStoredUnomiSegments");

        // if there are segments stored in localStorage, parse the output to get an object
        if (localSegmentObject != null) {
            localSegmentObject = JSON.parse(localSegmentObject);
        }

        // create an object to send to Mautic
        var mauticObject = {
            "personalisation_segment_u": segmentsUuid,
            "personalisation_segment_l": segmentsNames
        };

        // check if there are properties to send to Mautic and if the Unomi segments changed to only send the segments to Mautic if they changed (to reduce the amount of pageviews being sent to Mautic)
        if (Object.keys(mauticObject).length > 0 && !shallowEqual(mauticObject, localSegmentObject)) {
            // only send Mautic event if there is at least one property to be sent and if the segments changed (with this we also detect name changes of segments)
            mt('send', 'pageview', mauticObject);
            // save the object that we sent to Mautic in localStorage, to use this to check if something changed later on
            localStorage.setItem("myStoredUnomiSegments", JSON.stringify(mauticObject));
        }
    }

    window.dsdc('afterResponse', sendToMauticHandler);
</script>
DXP
In this example we will set up Unomi to keep track of visitors visiting the DXP marketing page, so we can create a segment to categorise those visitors, which we will also send to Mautic to update their contact information.
Snippet 1
We use this snippet to set a flag when the visitor interacts with the target page:
<script>
    // enable namespace that handles the queue and methods
    window.dsdc = window.dsdc || function () { (dsdc.q = dsdc.q || []).push(arguments) }; dsdc.l = +new Date;

    // track interaction with DXP marketing page
    window.dsdc('beforeRequest', function (data) {

        // temporary store our capture data & potential merge value
        var changedCapture = data.requestData;

        // check if the visitor interacted with the dxp marketing page
        if (changedCapture.surfing.te__pathName == "/en/dxp/dropsolid-experience-cloud-marketers") {
            // set flag
            changedCapture.bo__visitedPageDXP = true;
        }

        // use a global function to pass the modified capture back to the main script
        dsdc.updateCapture(changedCapture);
    });
</script>
Segment
The new property will be available when creating a segment when at least one profile has the new property, so we click once on the dxp marketing page in order for the flag to get in a profile.
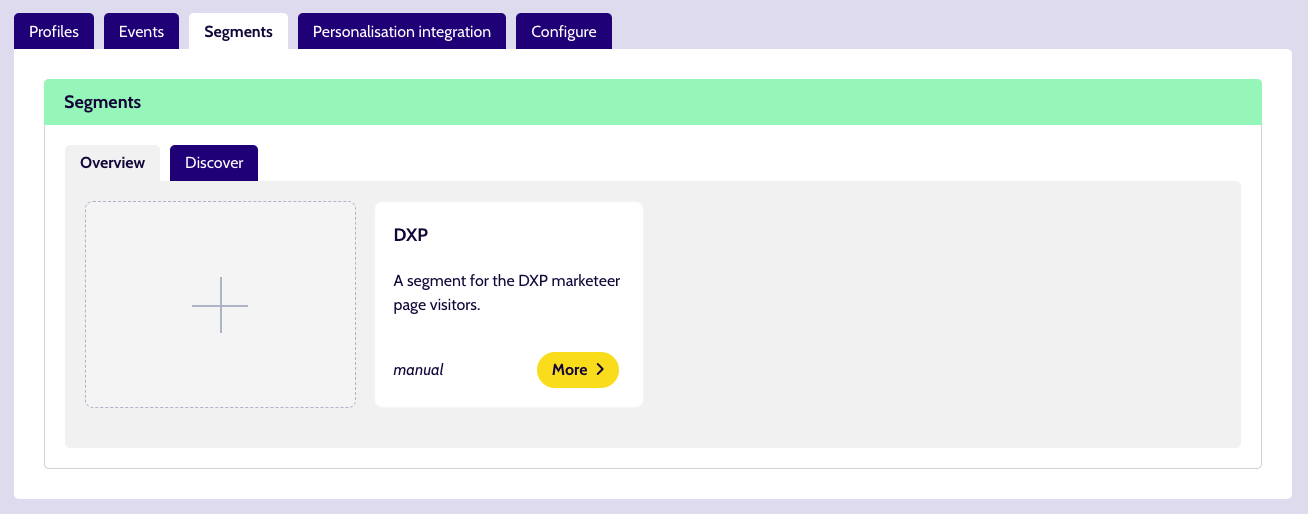
Now that Unomi has this flag property, we can create a segment to start categorising the visitors.
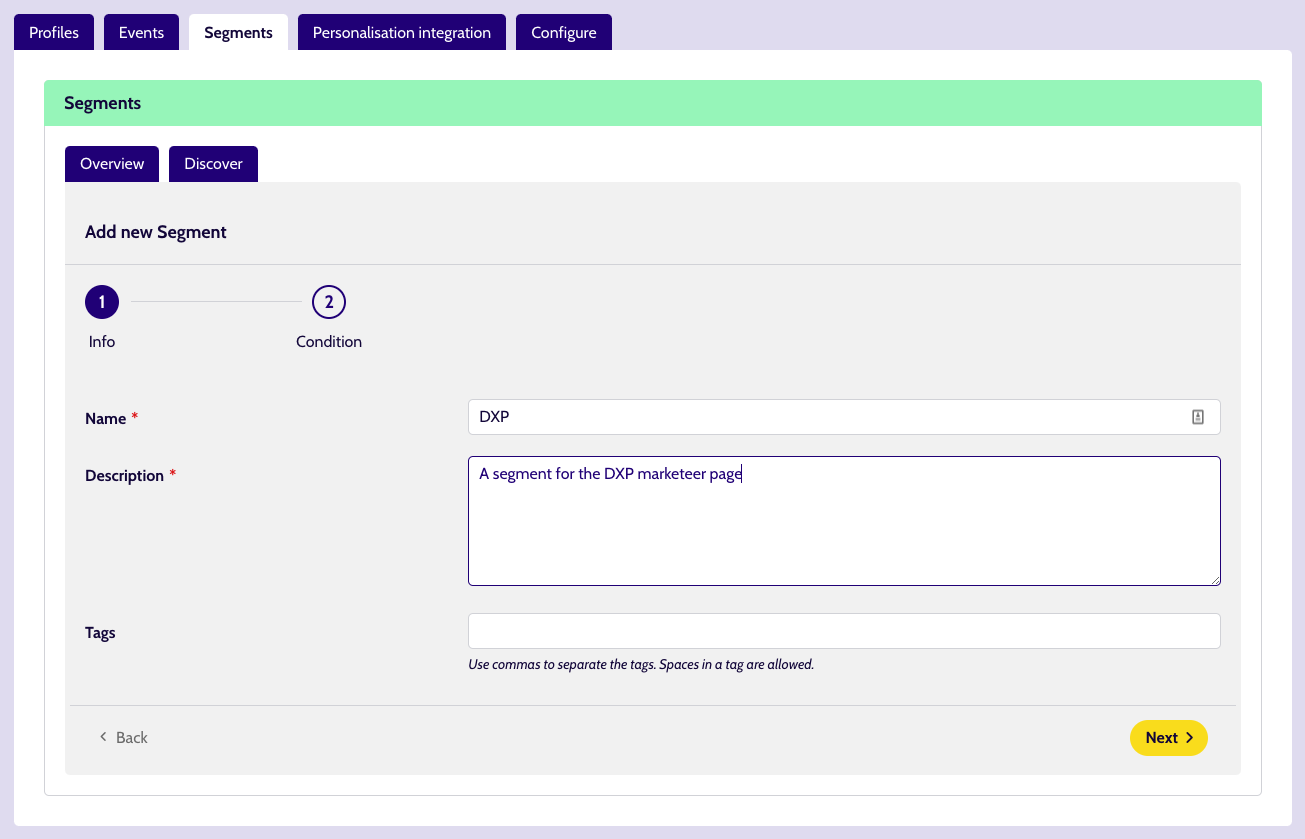
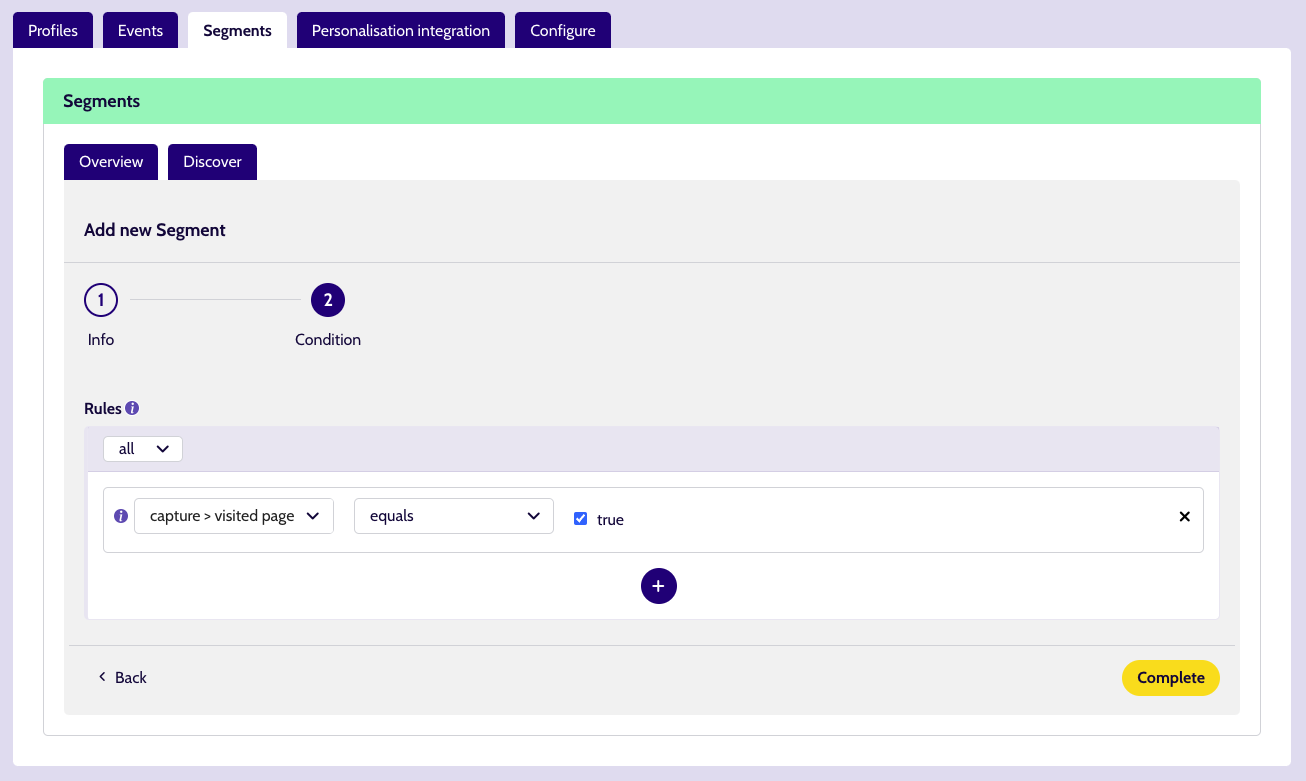
We create a segment which we name DXP. Here we add a rule which checks if the flag property is true, so if the visitor interacted with the DXP marketing page Unomi will assign this segment to the visitor.
Now that we have the segment, we can integrate Mautic so it can receive the created segment.
Snippet 2
We create the custom fields necessary in Mautic to implement this example:
- 1 for the Unomi profile segment uuids
- 1 for the Unomi profile segment names
| Human readable label | Alias | Publicly updatable |
|---|---|---|
| personalisation segment uuid | personalisation_segment_u | Yes |
| personalisation segment label | personalisation_segment_l | Yes |
We use this snippet to get the segment names and uuids from the visitor's Unomi profile and send them to Mautic:
<script>
    // enable namespace that handles the queue and methods
    window.dsdc = window.dsdc || function () { (dsdc.q = dsdc.q || []).push(arguments) }; dsdc.l = +new Date;

    // this is a function to be able to compare 2 objects with each other
    // we use it to check if the user's Unomi segments have changed
    function shallowEqual(object1, object2) {
        if (object1 == null || object2 == null) {
            return false;
        }
        const keys1 = Object.keys(object1);
        const keys2 = Object.keys(object2);
        if (keys1.length !== keys2.length) {
            return false;
        }
        for (let key of keys1) {
            if (object1[key] !== object2[key]) {
                return false;
            }
        }
        return true;
    }

    // this is the function that reads the profile segment uuids and human readable names and sends them to Mautic
    var sendToMauticHandler = function (data) {
        // create a string of all the uuids of the segments, separated by ", "
        var segmentsUuid = data.responseData.profile.profileSegments.join(", ");

        // if the user doesn't belong to a segment, use the standard value "_unknown"
        if (segmentsUuid == "") {
            segmentsUuid = "_unknown";
        }

        // create a string of all the names of the segments, separated by ", "
        var segmentsNames = data.responseData.profile.profileSegmentNames.join(", ");

        // if the user doesn't belong to a segment, use the standard value "_unknown"
        if (segmentsNames == "") {
            segmentsNames = "_unknown";
        }

        // get the last known segments from localStorage
        var localSegmentObject = localStorage.getItem("myStoredUnomiSegments");

        // if there are segments stored in localStorage, parse the output to get an object
        if (localSegmentObject != null) {
            localSegmentObject = JSON.parse(localSegmentObject);
        }

        // create an object to send to Mautic
        var mauticObject = {
            "personalisation_segment_u": segmentsUuid,
            "personalisation_segment_l": segmentsNames
        };

        // check if there are properties to send to Mautic and if the Unomi segments changed to only send the segments to Mautic if they changed (to reduce the amount of pageviews being sent to Mautic)
        if (Object.keys(mauticObject).length > 0 && !shallowEqual(mauticObject, localSegmentObject)) {
            // only send Mautic event if there is at least one property to be sent and if the segments changed (with this we also detect name changes of segments)
            mt('send', 'pageview', mauticObject);
            // save the object that we sent to Mautic in localStorage, to use this to check if something changed later on
            localStorage.setItem("myStoredUnomiSegments", JSON.stringify(mauticObject));
        }
    }

    window.dsdc('afterResponse', sendToMauticHandler);
</script>
Test
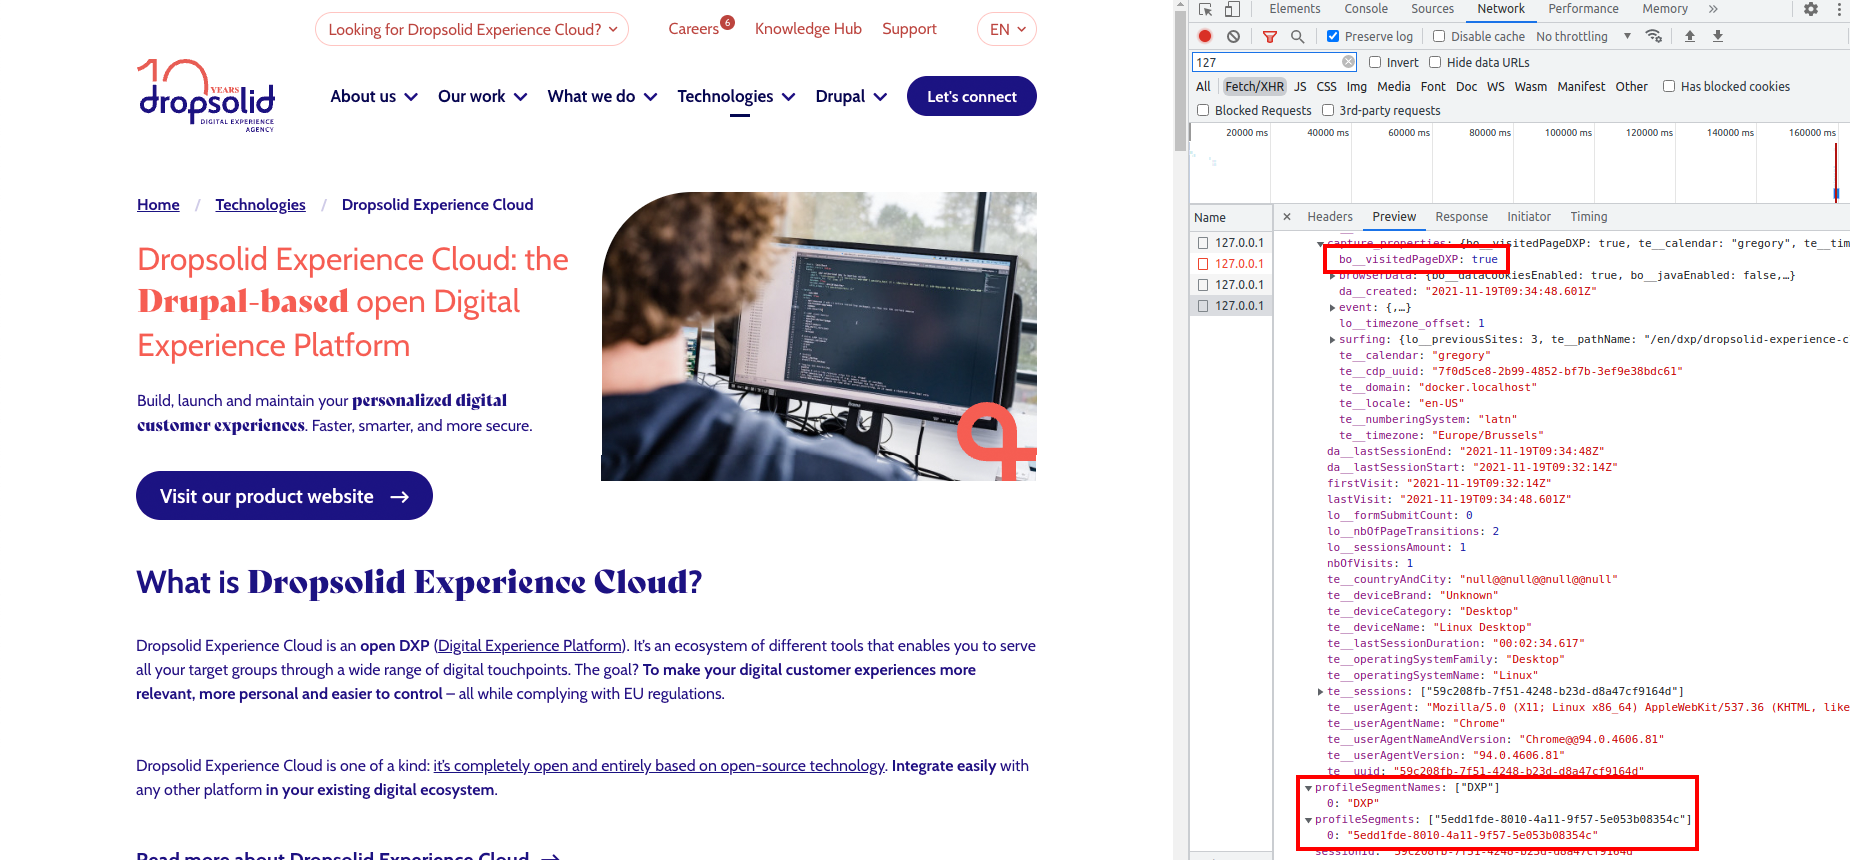
We start on Dropsolid's What we do - Build page and interact with the page by clicking around a few times. By inspecting the page, we see that our Unomi profile does not have the DXP flag and therefore no segment.
Next, we go to DXP marketing page. By inspecting the page, we see that Unomi has detected we visited the target page and assigned the DXP segment to our profile.
Our contact in Mautic is also enriched by the DXP segment that it received.
People interested in DXP can now be contacted with more relevant information for their needs!
I want to group my custom properties in the properties list for segments
We want to add some extra data about date and time to the capture.
But we also want this data to be grouped when we are making a segment, to be able to more easily find our custom data.
To do this, we have to group our data when adding it to the capture, before sending the capture to the API.
This snippet allows us to add our properties as a group to the capture and therefore to Unomi as well.
<script>
    window.dsdc = window.dsdc || function () { (dsdc.q = dsdc.q || []).push(arguments) }; dsdc.l = +new Date;

    window.dsdc('beforeRequest', function (data) {
        var changedCapture = data.requestData;

        var today = new Date();
        var thisYear = today.getFullYear();
        var thisMonth = today.getMonth();   // 1 = January, 12 = December
        var thisDayOfMonth = today.getDate();
        var thisDayOfWeek = today.getDay(); // 0 = Sunday, 6 = Saturday

        var thisHours = today.getHours();
        var thisMinutes = today.getMinutes();
        var thisSeconds = today.getSeconds();
        var thisTimeZoneOffset = -today.getTimezoneOffset()/60

        myCustomProperties = {
            "da__fullDate": today,
            "lo__year": thisYear,
            "lo__month": thisMonth,
            "lo__dayOfMonth": thisDayOfMonth,
            "lo__dayOfWeek": thisDayOfWeek,
            "time": {
                "lo__hours": thisHours,
                "lo__minutes": thisMinutes,
                "lo__seconds": thisSeconds,
                "lo__timeZoneOffset": thisTimeZoneOffset
            }
        };

        changedCapture.myCustomProperties = myCustomProperties;

        // use a global function to pass the modified capture back to the main script
        dsdc.updateCapture(changedCapture);
    });
</script>
We can then create a segment with these properties.
The dropdown will look like this:
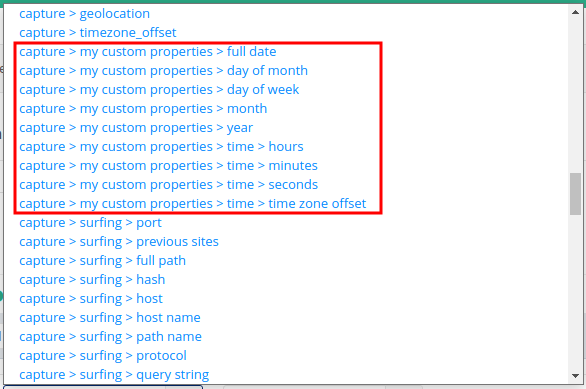
Note that this method will always result in your custom group being a part of capture >.
There is currently no way to change this.
Loading content dynamically based on the segment a visitor belongs to
It is possible to show personalized content to a visitor, based on their segment (let's call this 'segment related content'), purely via front-end code and HTML. For this we need: - content wrapped in HTML with some specific attributes on it - some Javascript to read the visitor's profile data - optionally, some CSS (either inline or externally loaded)
HTML
In order to properly target our segment related content, we'll need to wrap it in HTML containing some specific data-attributes and attributes to set the visibility.
data-attributes
data-dsdc-visible="true": mark a piece of content as initially hidden. This will remain hidden until validated by the Javascript (see further down).data-dsdc-placeholder="true": (optional) mark a piece of content as a placeholder. Meaning it will be visible from the start of the page loading up until segment related content is made visible. Don't use it if you don't need a placeholder (or set it to "false").data-dsdc-segment="segment-uuid-goes-here": This will determine that the piece of content will be made visible for the targetted segment. Fill in the segment UUID of the segment you want to target and the Javascript will make sure it is displayed to those visitors.
attributes
hidden: ensures the browser doesn't render the element, essentially hiding it completely- since this is set directly on the html, it will get picked up faster than
display: noneset via CSS
- since this is set directly on the html, it will get picked up faster than
aria-hidden: explicitly hides content from screen-readers and accessibility tools- this may seem redundant with
hidden(and other ways of hiding content) in place, but we set it in casehidden(or other methods) break due to a site's own CSS or JS or even a 3rd party tool (eg. a text reader) reading the page.
- this may seem redundant with
<!-- Example of a placeholder block: visible until segment specific content is loaded -->
<div class="dynamic-content" data-dsdc-placeholder="true" data-dsdc-visible="true">
  This is a generic placeholder. <br />
  Laoreet sit amet cursus sit amet dictum sit. Elit duis tristique sollicitudin nibh sit. Congue eu consequat ac felis donec et odio pellentesque diam
</div>

<!-- Example of a block meant for a segment based on UUID -->
<div class="dynamic-content dynamic-content--first-time-visitors" data-dsdc-segment="758da07b-de5a-4b70-8472-85acea9452b3" data-dsdc-visible="false" aria-hidden="true" hidden>
  This is some content to be shown to 'First time visitors' segment
</div>
CSS
Besides using HTML to hide the dynamic content, as a best practice, we should also set the blocks' display to none. This hides an element from view as well as text readers, so it functions as a fallback in case some external CSS or JS has overwritten the display or or messes with the hidden attribute.
Luckily this is not a must-have, since the Javascript below can also set display. It just executes faster if you can set it yourself using inline CSS or in a stylesheet/style-tag.
Example: using Inline CSS
<div style="display:none;" data-dsdc-visible="false" aria-hidden="true">
Example: using a style tag or in an external stylesheet
[data-dsdc-visible="false"] {
  display: none !important;
}
Javascript
Now that our content is hidden from view and readers, we need to use Javascript to dynamically toggle their visibility.
Using existing capture methods, we want the script to read the capture data as it comes back from the capture API. This has to happen AFTER an initial capture has been sent out, so the machine learning algorithms on the other end has been able to categorize our visitor and assign them to a segment.
So we'll have to use the afterResponse method.
What is also important, is that the Javascript responsible for showing or hiding content, is only executed AFTER the proper HTML has loaded on the page. So we check the response after DOM has loaded by using the dom event trigger.
<script>
  // ** initialize the namespace we need to access capture script methods
  window.dsdcSettings = window.dsdcSettings || {};

  // enable namespace that handles the queue and methods
  window.dsdc = window.dsdc || function () { (dsdc.q = dsdc.q || []).push(arguments) }; dsdc.l = +new Date;

  // ** Re-enable 'dom' event capture, that is blocked by default
  //    We want to make use of the DOMloaded event,
  //    to guarantee the HTML is loaded before trying to toggle the content
  window.dsdcSettings.preventCapture = window.dsdcSettings.preventCapture || {};
  window.dsdcSettings.preventCapture.dom = false;

  // ** We use 'afterResponse' because we need to get to the data that is sent back by the API
  //    so we can see what Segments exist to match
  // -- We also want to make use of the DOMloaded event,
  //    to guarantee the HTML is loaded before trying to toggle the content
  var afterResponseLoadHandler = function(response) {

    // This is where our code will go

  };

  window.dsdc('afterResponse', 'dom', afterResponseLoadHandler);

</script>
Now that the Javascript setup is done, we need to add some scripting to target our content, based on segment UUID.
This goes inside the afterResponseLoadHandler function:
// check for segment related content, based on data-attributes
var elements = document.querySelectorAll('[data-dsdc-visible]');
var placeholders = document.querySelectorAll('[data-dsdc-placeholder]');

// if segment related content is found
if (elements.length > 0 ) {

  // get the names of Segments (optional, we can use this as fallback)
  var segmentNames = response.responseData.profile.profileSegmentNames;
  // more important, get the segment UUIDs active for this project
  var segmentsUUIDs = response.responseData.profile.profileSegments;

  // a function to match our dynamic content with existing segment UUIDs
  function matchSegments(elements, segments) {

    // loop our hidden content
    Array.prototype.forEach.call(elements, function(el, i){
      var visible = el.getAttribute('data-dsdc-visible');
      var segmentId = el.getAttribute('data-dsdc-segment');
      var hide = true;

      // see if their segment UUID matches one from the profile segments
      // so we can show that element
      // otherwise, hide (or keep hidden)
      for (var i in segments) {
        if (typeof segments[i] !== 'undefined' && segmentId === segments[i]) {
          // mark element as to be shown
          hide = false;
        }
      }

      // if there were no segment matches, no need to show the element
      if (hide) {
        // if visible, set the variables/style to hide the element
        if (visible || visible === 'true') {
          // in case inline styles are used, turn off display here
          el.style.display = 'none';
          // set the related (data) attributes
          el.setAttribute('data-dsdc-visible', false);
          el.setAttribute('aria-hidden', true);
          el.setAttribute('hidden', true);

          // hide the placeholders, if there are any
          Array.prototype.forEach.call(placeholders, function(placeholder, j) {
            // in case inline styles are used, turn off display here
            el.style.display = 'none';
            // set the related (data) attributes
            placeholder.setAttribute('data-dsdc-visible', false);
            placeholder.setAttribute('aria-hidden', true);
            placeholder.setAttribute('hidden', true);
          });
        }
      // if a match was found, need to show the element
      } else {
        // if not already visible, set the correct attributes & style to reveal the element
        if (typeof visible === 'undefined' || !visible || visible === 'false' || visible === null) {
          // in case inline styles are used, remove display here
          el.style.removeProperty('display');
          // reset & remove the related (data) attributes
          el.setAttribute('data-dsdc-visible', true);
          el.removeAttribute('aria-hidden');
          el.removeAttribute('hidden');
        }
      }

    });
  }

  // ** We can make use of the Segment UUID, to check for matches
  //    we can also fall back on trying segment names, but that is not recommended
  //    because names change while UUID's do not

  if (segmentsUUIDs.length) {
    matchSegments(elements, segmentsUUIDs);
  } else {
    if (segmentNames.length) {
      matchSegments(elements, segmentNames);
    }
  }
}
Now, with all this in place, your visitors will see the placeholder block, unless they belong to a segment that is linked to a block of content (using the data attribute data-dsdc-segment).
Because a large part of the functionality is done by Javascript, you might get a flash of the placeholder block before the targetted content is made visible.
Note: if this is your visitor's first visit to a project where data is being captured, they will not have been assigned to a segment yet. This is to be expected, as our machine learning algorithms needs to process some capture data first, before they can categorize. This is the case regardless if the showing of segment related content happens in the front-end or via the back-end.
Enrich Unomi profiles with custom data not originating from the capture script
Warning
This is only meant to enrich your Unomi profile data when you are unable to do so through the capture script API.
If you are able to enrich the data using the capture script API, use that method instead.
For example: an integration with Google Analytics where Google Analytics gets the dropsolidCapture cookie and depending on that needs to set a custom property in the Unomi profiles.
It is possible to enrich Unomi profiles with extra custom data, by directly sending this data to the Unomi API.
This is possible because of a custom Unomi plugin, which gets executed on a customData event.
This custom plugin is present by default on every Unomi hosted by Dropsolid.
For example: I want to add some custom properties to a user's Unomi profile.
POST https://{unomi_url}/context.json?sessionId={sessionId}

body:
  {
      "source": {
          "itemType": "event",
          "scope": "{cdp_uuid}",
          "itemId": "event"
      },
      "events": [
          {
              "eventType": "customData",
              "scope": "{cdp_uuid}",
              "source": {
                  "itemType": "event",
                  "scope": "{cdp_uuid}",
                  "itemId": "event"
              },
              "properties": {
                  "customDictProperty": {
                      "customStr": "thisIsAString",
                      "customList": ["5", "7", "three"]
                  },
                  "customStrProperty": "test"
              }
          }
      ],
      "requiredProfileProperties": ["*"],
      "requireSegments": true
  }
{sessionId} and {cdp_uuid} can be found in the dropsolidCapture cookie.
This API call will send a customData event to your Unomi.
This will trigger the plugin which will add the properties of the customData event to the Unomi profile of the sessionId in the query parameter.
In this example the properties are:
{
    "customDictProperty": {
        "customStr": "thisIsAString",
        "customList": ["5", "7", "three"]
    },
    "customStrProperty": "test"
}
custom_properties.If the key
custom_properties already exists in the user's Unomi profile, then the new custom properties wil be added to the existing custom properties. The existing custom properties will not be overwritten.
These custom properties can also be used to create a segment:

Send a capture with a custom trigger
Hook into an event, add data from that event to the capture and send the capture
In this example, we will hook into an event called 'myEvent'. We will add data from that event to the capture and then also immediately send the capture to the API.
You can use this example and update it to hook into other events from e.g. Mautic or Matomo, to send that event data to Unomi.
Example:
- sending Matomo goals to Unomi with our own trigger.
Snippet
window.dsdc = window.dsdc || function () { (dsdc.q = dsdc.q || []).push(arguments) }; dsdc.l = +new Date;
window.dsdcSettings = window.dsdcSettings || {};
dsdcSettings.preventCapture = dsdcSettings.preventCapture || {};

// turn the manual captures on (they are prevented by default)
dsdcSettings.preventCapture.manual = false;
window.dsdc('preventCapture', false, 'manual');

document.addEventListener('myEvent', function (e) {

  var eventDataToCapture = function(data) {
    console.log("before request");

    var changedCapture = data.requestData;

    changedCapture.te__myEvent_id = e.detail.id;  // get data (id) from the event data

    // update the capture with your new data
    dsdc.updateCapture(changedCapture);
  }
  window.dsdc('beforeRequest', eventDataToCapture);

  // send the capture
  dsdc.sendCapture();
});
' fill='%235BE798'/%3E%3Crect x='16' y='250' width='16' height='140' transform='rotate(-180 16 250)' fill='%235BE798'/%3E%3Crect x='16' y='250' width='16' height='140' transform='rotate(-180 16 250)' fill='%235BE798'/%3E%3Crect x='91' y='16' width='16' height='283' transform='rotate(-90 91 16)' fill='%235BE798'/%3E%3Crect x='91' y='16' width='16' height='283' transform='rotate(-90 91 16)' fill='%235BE798'/%3E%3Crect x='91' y='16' width='16' height='283' transform='rotate(-90 91 16)' fill='%235BE798'/%3E%3C/svg%3E)